Live streaming doesn't have to mean expensive infrastructure or third-party dependency. With a handful of open-source tools and a couple of Docker containers, you can build a fully self-hosted platform that accepts an RTMP push from an Android device, serves a low-latency HLS stream to any browser, and automatically archives every session as a downloadable VOD file. This post walks through exactly that setup.
Architecture overview
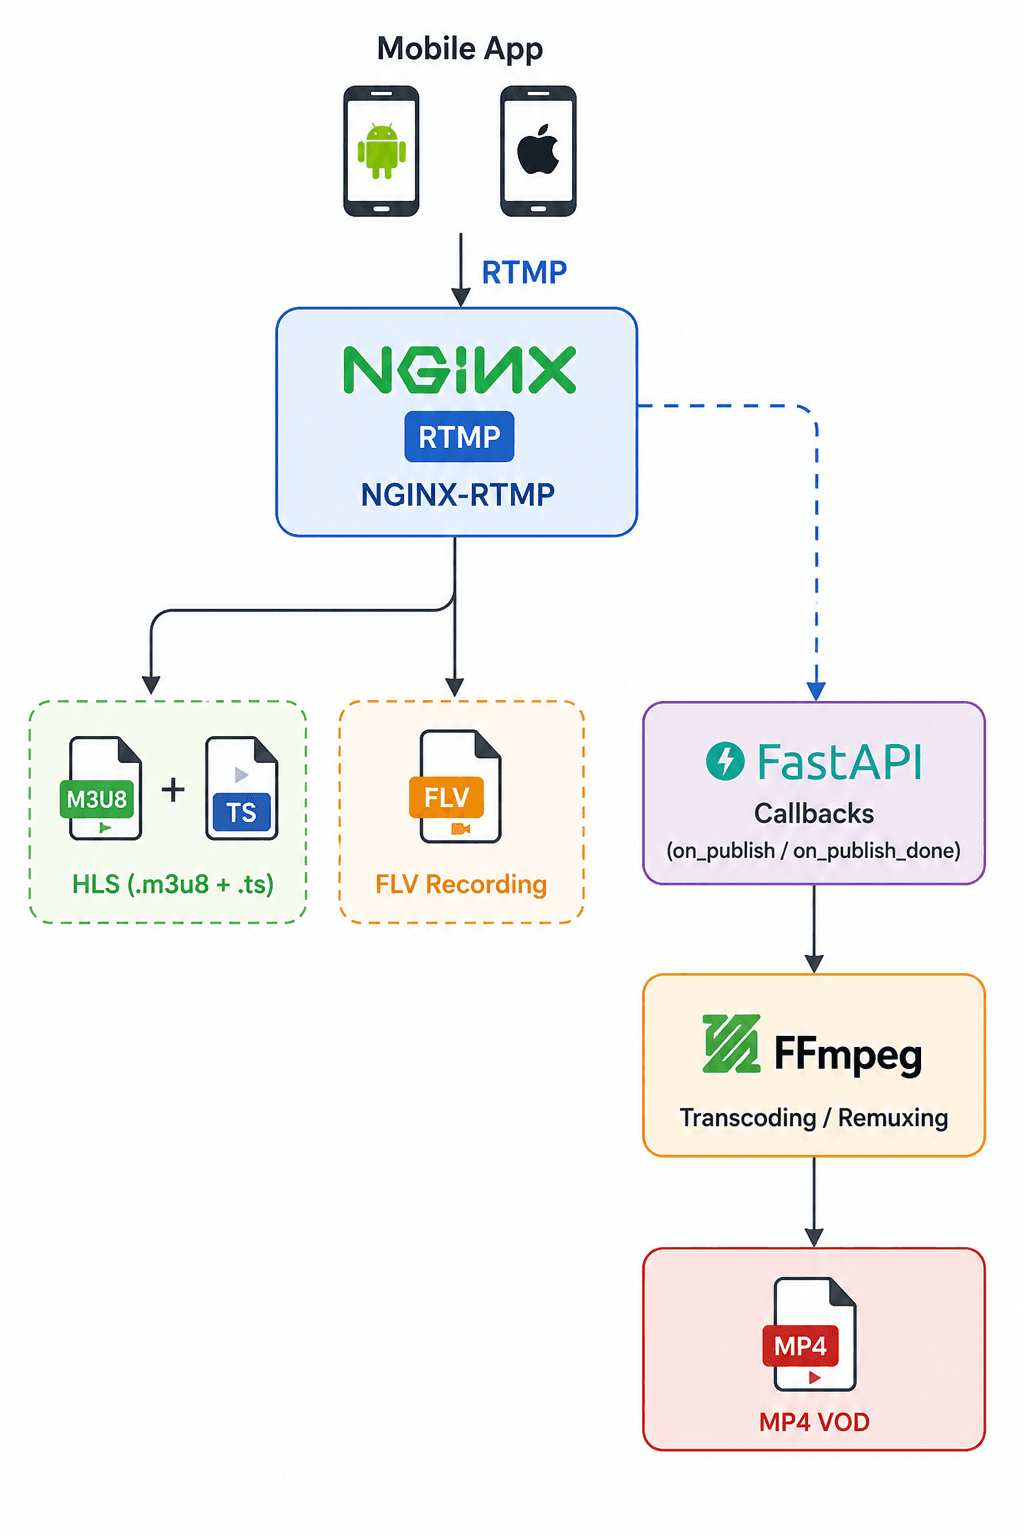
NGINX-RTMP and FastAPI connected via shared volumes
There are two Docker containers managed by Compose:
- nginx-rtmp - built on
tiangolo/nginx-rtmp, this container listens on port 1935 for incoming RTMP and serves HLS over HTTP on port 80, which Docker Compose maps to 8080 on the host.
- backend - a FastAPI application that receives webhook calls from NGINX at stream start and end, enforces single-stream-per-name rules, and triggers FFmpeg to convert recordings into MP4 VODs.
They share three bind-mounted directories: /tmp/hls, /tmp/vod, and /tmp/recordings, so files written by one container are immediately visible to the other.
Project structure

nginx and backend sit at the same level, each with its own Dockerfile
Step 1: Docker Compose
Everything is wired together in docker-compose.yml. Notice the shared volumes - this is what lets the backend read recordings written by NGINX and write VOD files that NGINX can serve.
services:
  nginx-rtmp:
    build:
      context: ./nginx
    container_name: nginx-rtmp
    ports:
      - "1935:1935"
      - "8080:80"
    volumes:
      - ./hls:/tmp/hls
      - ./vod:/tmp/vod
      - ./recordings:/tmp/recordings
    depends_on:
      - backend

  backend:
    build:
      context: ./backend
    container_name: backend
    ports:
      - "8000:8000"
    volumes:
      - ./hls:/tmp/hls
      - ./vod:/tmp/vod
      - ./recordings:/tmp/recordings
Note that depends_on only controls startup order, not service readiness - a healthcheck condition would make this more reliable in production.
Step 2: NGINX-RTMP configuration
The NGINX container is built from tiangolo/nginx-rtmp with FFmpeg added:
FROM tiangolo/nginx-rtmp

RUN apt-get update && apt-get install -y ffmpeg

COPY nginx.conf /etc/nginx/nginx.conf
The real work is in nginx.conf. The rtmp block accepts the RTMP connection, slices it into HLS fragments, records it as an FLV, and fires webhooks:
worker_processes  auto;

events {
    worker_connections  1024;
}

rtmp {
    server {
        listen 1935;
        chunk_size 4096;

        application live {
            live on;
            hls on;
            hls_path /tmp/hls;
            hls_fragment 2s;
            hls_playlist_length 120s;
            hls_cleanup off;

            record all;
            record_path /tmp/recordings;
            record_unique on;

            on_publish http://backend:8000/publish_start;
            on_publish_done http://backend:8000/publish_end;
        }
    }
}
Key decisions here:
hls_fragment 2s gives you roughly 2-second latency increments - lower values reduce latency but increase the number of HTTP requests from the player.record_unique on appends a timestamp to each recording filename, so reruns never overwrite previous sessions.
The HTTP server block serves the HLS output directory with the correct MIME types and CORS headers so browsers (and remote players) can reach the stream:
http {
    include       mime.types;
    default_type  application/octet-stream;

    server {
        listen 80;

        location /hls {
            types {
                application/vnd.apple.mpegurl m3u8;
                video/mp2t ts;
            }
            root /tmp;
            expires -1;
            add_header Cache-Control no-cache;
            add_header Access-Control-Allow-Origin *;
        }
    }
}
Step 3: The FastAPI backend
The backend is a slim Python service with two endpoints. Its Dockerfile installs FFmpeg alongside the Python dependencies because vod_service.py invokes it as a subprocess:
FROM python:3.14-slim

WORKDIR /app

RUN apt-get update && apt-get install -y ffmpeg \
    && rm -rf /var/lib/apt/lists/*

COPY requirements.txt .
RUN pip3 install --no-cache-dir -r requirements.txt

COPY app ./app

CMD ["uvicorn", "app.main:app", "--host", "0.0.0.0", "--port", "8000"]
/publish_start - Stream guard
When NGINX receives an incoming RTMP connection, it POSTs to this endpoint before the stream goes live. A non-200 response from here causes NGINX to reject the stream. We use that in main.py to prevent duplicate concurrent streams under the same name. Note that active_streams is in-memory and lost on restart. For production use, replace it with a persistent store.
from fastapi import FastAPI, Form, Response, HTTPException
from app.services.vod_service import create_vod
from glob import glob
import logging

logging.basicConfig(level=logging.INFO)
logger = logging.getLogger(__name__)

app = FastAPI()
active_streams = set()


@app.post("/publish_start")
async def publish_start(
    app_name: str = Form(..., alias="app"),
    name: str = Form(...)
):
    if name in active_streams:
        raise HTTPException(
            status_code=403,
            detail=f"Stream '{name}' is already active."
        )

    active_streams.add(name)

    logger.info(f"STREAM STARTED: {name}")
    return Response(status_code=200)
/publish_end - VOD creation
When the RTMP connection drops, NGINX fires on_publish_done event. The backend removes the stream from the active set, finds the most recently created FLV recording, and passes it to the VOD service. Note that NGINX may not have fully flushed the FLV to disk at that point. In practice this is rarely an issue, but a production setup should verify the file before passing it to FFmpeg. HLS segment files are then deleted so stale content doesn't linger:
@app.post("/publish_end")
async def publish_end(
    app_name: str = Form(..., alias="app"),
    name: str = Form(...)
):
    active_streams.discard(name)
    logger.info(f"STREAM ENDED: {name}")

    stream_files = glob(f"/tmp/recordings/{name}-*.flv")

    if not stream_files:
        logger.warning(f"No recording found for stream: {name}")
        return Response(status_code=200)

    latest_stream = sorted(stream_files)[-1]

    create_vod(latest_stream)
    cleanup_stream(latest_stream)

    return Response(status_code=200)


def cleanup_stream(stream_name: str):
    import os
    from pathlib import Path

    name = Path(stream_name).stem.rsplit("-", 1)[0]
    hls_dir = "/tmp/hls"

    logger.info("Cleanup")
    for f in os.listdir(hls_dir):
        if f == f"{name}.m3u8" or f.startswith(f"{name}-") or f.startswith(f"{name}."):
            os.remove(os.path.join(hls_dir, f))
            logger.info(f"Deleted file: {f}")

    try:
        os.remove(stream_name)
        logger.info(f"Deleted file: {stream_name}")
    except Exception as e:
        logger.error(f"Failed to delete file: {stream_name}: {e}")
VOD conversion
create_vod is defined in vod_service.py, and it spawns FFmpeg as a background process with -c copy - meaning it remuxes from FLV container to MP4 without re-encoding. This is extremely fast and CPU-cheap since no transcoding happens. Note that subprocess.run blocks until FFmpeg finishes, so /publish_end will not return until the VOD is created. In production, offload this operation to a background thread or a task queue.
import subprocess
from pathlib import Path
import logging

logging.basicConfig(level=logging.INFO)
logger = logging.getLogger(__name__)


def create_vod(stream_name: str):
    input_file = stream_name
    vod_name = Path(stream_name).stem
    output_video = (f"/tmp/vod/{vod_name}.mp4")

    result = subprocess.run([
        "ffmpeg", "-y",
        "-i", input_file,
        "-c", "copy",
        output_video
    ], capture_output=True, text=True)

    if result.returncode != 0:
        logger.error(f"FFmpeg failed for {input_file}: {result.stderr}")
    else:
        logger.info(f"VOD created: {output_video}")
Step 4: The HLS player
The web player uses HLS.js for browsers without native HLS support, while Safari plays HLS natively. It's a single HTML file you can open locally or serve statically:
<!DOCTYPE html>
<html>
<head>
    <title>Live Stream</title>
    <script src="https://cdn.jsdelivr.net/npm/hls.js@latest"></script>
</head>
<body>
    <video id="video" controls autoplay style="width: 30%;"></video>
    <script>
        var video = document.getElementById('video');
        if (Hls.isSupported()) {
            var hls = new Hls({
                liveSyncDuration: 3,
                liveMaxLatencyDuration: 10,
            });

            hls.loadSource('http://<server-ip>:8080/hls/stream.m3u8');
            hls.attachMedia(video);

            hls.on(Hls.Events.MANIFEST_PARSED, function () {
                video.muted = true;
                video.play();
            });
        } else if (video.canPlayType('application/vnd.apple.mpegurl')) {
            video.src = 'http://<server-ip>:8080/hls/stream.m3u8';
        }
    </script>
</body>
</html>
Replace <server-ip> with your server's IP or hostname. The liveSyncDuration: 3 setting keeps the player 3 seconds behind the live edge, which gives a reasonable buffer against network jitter without adding unnecessary delay.
Step 5: The Android streaming client
You can build your own RTMP broadcaster for Android based on RootEncoder, an open-source library that handles all the low-level encoding and protocol work for you.
Adding the dependency
RootEncoder is distributed via JitPack. Add the repository and the dependency to your build.gradle:
dependencyResolutionManagement {
repositories {
maven {
setUrl("https://jitpack.io")
}
}
}
dependencies {
implementation("com.github.pedroSG94.RootEncoder:library:<version>")
implementation("com.github.pedroSG94.RootEncoder:extra-sources:<version>")
}
Required permissions
The app needs a camera, a microphone, and internet access. Add these to AndroidManifest.xml:
<uses-permission android:name="android.permission.INTERNET" />
<uses-permission android:name="android.permission.CAMERA" />
<uses-permission android:name="android.permission.RECORD_AUDIO" />
The Activity
For simplicity in this case, the entire broadcaster UI and logic are in a single ComponentActivity. Also, code for permissions (CAMERA and RECORD_AUDIO) is omitted because the focus is on the stream implementation. The key object is RtmpCamera1, which takes a SurfaceView for the camera preview and a ConnectChecker callback to track connection state.
Note: RtmpCamera1 is shown here for simplicity. For new projects targeting API 21+, consider RtmpStream, which supports background streaming and activity rotation out of the box.
class MainActivity : ComponentActivity() {

    private lateinit var rtmpCamera: RtmpCamera1
    private lateinit var surfaceView: SurfaceView

    private val _isStreaming = MutableStateFlow(false)
    private val isStreaming = _isStreaming.asStateFlow()

    override fun onCreate(savedInstanceState: Bundle?) {
        super.onCreate(savedInstanceState)
        enableEdgeToEdge()

        surfaceView = SurfaceView(this)
        rtmpCamera = RtmpCamera1(surfaceView, object : ConnectChecker {
            override fun onConnectionStarted(url: String) {}

            override fun onConnectionSuccess() {
                _isStreaming.update { true }
            }

            override fun onConnectionFailed(reason: String) {
                rtmpCamera.stopStream()
                _isStreaming.update { false }
            }

            override fun onDisconnect() {
                rtmpCamera.stopStream()
                _isStreaming.update { false }
            }

            override fun onAuthError() {}
            override fun onAuthSuccess() {}
        })

        setContent {
            BroadcasterTheme {
                Scaffold(modifier = Modifier.fillMaxSize()) { innerPadding ->
                    Column(modifier = Modifier.padding(innerPadding)) {
                        val state by isStreaming.collectAsStateWithLifecycle()
                        RtmpStreamUI(state)
                    }
                }
            }
        }
    }
}
ConnectChecker is where you react to connection lifecycle events. On success, a MutableStateFlow is flipped to true, which the Compose UI observes to swap the button label. On failure or disconnect, the stream is stopped, and the state resets - no manual cleanup needed.
The Jetpack Compose UI
The UI is a single @Composable with a camera preview (via AndroidView to bridge the SurfaceView into Jetpack Compose), an editable RTMP URL field, and three control buttons:
class MainActivity : ComponentActivity() {
private lateinit var rtmpCamera: RtmpCamera1
private lateinit var surfaceView: SurfaceView
private val _isStreaming = MutableStateFlow(false)
private val isStreaming = _isStreaming.asStateFlow()
override fun onCreate(savedInstanceState: Bundle?) {
...
}
@Composable
fun RtmpStreamUI(isStreaming: Boolean) {
var url by remember { mutableStateOf("rtmp://<server-ip>:1935/live/stream") }
var isMicEnabled by remember { mutableStateOf(true) }
Column(modifier = Modifier.fillMaxSize()) {
AndroidView(factory = { surfaceView }, modifier = Modifier.weight(1f))
OutlinedTextField(
value = url,
onValueChange = { url = it },
modifier = Modifier
.fillMaxWidth()
.padding(8.dp),
label = { Text("RTMP URL") },
singleLine = true,
keyboardOptions = KeyboardOptions(
imeAction = ImeAction.Done
)
)
Row(
modifier = Modifier
.fillMaxWidth()
.padding(horizontal = 8.dp),
horizontalArrangement = Arrangement.SpaceEvenly
) {
Button(onClick = {
if (!isStreaming) {
if (rtmpCamera.prepareVideo() && rtmpCamera.prepareAudio()) {
rtmpCamera.startStream(url)
}
} else {
rtmpCamera.stopStream()
}
}) {
Text(if (isStreaming) "Stop" else "Start")
}
Button(onClick = {
rtmpCamera.switchCamera()
}) {
Text("Switch Camera")
}
Button(onClick = {
isMicEnabled = !isMicEnabled
if (isMicEnabled) {
rtmpCamera.enableAudio()
} else {
rtmpCamera.disableAudio()
}
}) {
Text(if (isMicEnabled) "Mute" else "Unmute")
}
}
}
}
}
The start/stop logic comes down to three lines: prepareVideo(), prepareAudio(), and startStream(url). Both prepare calls use sensible defaults (H.264 video, AAC audio) but accept parameters if you need to tune resolution, bitrate, or frame rate. The RTMP URL follows the pattern rtmp://<server-ip>:1935/live/<stream-key> - the stream key becomes the .m3u8 filename served by NGINX, so stream here matches http://<server-ip>:8080/hls/stream.m3u8 in the player.
Run the application
Start the services:
docker compose up --build -d
Build and install the Android app, enter your server's local IP in the RTMP URL field, and tap Start. The stream key at the end of the URL (e.g. stream) is what NGINX uses as the HLS filename - open http://<server-ip>:8080/hls/stream.m3u8 in player.html, and you should see your camera feed within a few seconds. Once you stop the stream, the MP4 will appear in your ./vod/ directory shortly after.
Future improvements
This setup covers the essentials, but there are some natural next steps if you want to push it further:
- Authentication - Add token validation in
/publish_start so only authorized apps can push.
- HTTPS - A reverse proxy with e.g. Let's Encrypt certificates would provide secure playback and API communication.
- Adaptive bitrate streaming - Generate multiple renditions (360p, 480p, 720p, 1080p, etc.).
- VOD catalogue - Add a FastAPI endpoint that lists files in
/tmp/vod and serves a simple UI from the same backend.
- Latency tuning - Dropping
hls_fragment to 1s and adjusting liveSyncDuration in HLS.js can bring end-to-end latency under 5 seconds on a good network.
- Background workers - FFmpeg jobs should eventually be processed by dedicated workers, which would improve scalability and fault tolerance.
- Replay and DVR - Preserve HLS segments.
Conclusion
Building a streaming platform from scratch is one of the best ways to understand modern video delivery. By combining NGINX-RTMP, Docker, FFmpeg, and native mobile applications, we can create a complete end-to-end streaming solution that handles live broadcasting, playback, and VOD generation.
While this setup is intentionally minimal, it provides a solid foundation for experimenting with authentication, adaptive streaming, analytics, and cloud deployment. Most importantly, it exposes the core concepts behind platforms that millions of people use every day.